How to Change a Diaper (An Illustrated Guide for Babysitters)

Written & Illustrated by
Matthew James Taylor
Kidsit Founder, General Manager

Diaper changing video by
Lydia Kutz
Babysitter, Infant Swimming Resources Instructor

Medically Reviewed by
Gina Maria Jansheski, MD, FAAP
Board-Certified Pediatrician, Medical Reviewer
Key Takeaways
- Always have all your supplies within arm’s reach and never leave the baby unattended on the changing surface.
- Follow a clear, consistent sequence: remove the soiled diaper, clean (front to back), slide in a clean diaper, apply cream (if needed), fasten, and adjust for fit.
- Be gentle yet thorough - especially in skin folds, and dry the baby well before putting on a fresh diaper.
- Use diaper changes as a chance to bond - talk, make eye contact, and distract with toys or singing.
- Be ready for messes and “blow-outs” by bringing extra diapers, wipes, and spare clothes.
- Avoid powders (especially talcum) due to breathing risks - favour barrier creams or ointments if parents allow.
- With practice, diaper changing becomes routine - don’t stress if you’re slow at first.
Changing a baby can seem pretty intimidating if you've never done it before. But most babysitters will get the hang of it after they've tried it a few times. Infants can go through 10 diapers a day. So if you're babysitting one, you're going to get lots of opportunities to practice!
How do you change a diaper? Start by making sure you have all of the supplies you'll need within reach. Undo the diaper, wipe the baby down, and remove the dirty diaper. Slide a clean diaper under the baby, close it, and adjust for fit. Excess solid waste can be discarded in the toilet, and then the dirty diaper can be binned.
Kidsit babysitting statistics
48.93% of babysitters are confident changing diapers and provide this service to clients.
(Babysitting statistics calculated weekly from our live member data — Updated 1 Jul 2026)
In this article, I'll walk you through the complete step-by-step process you'll need to change a diaper. I'll explain how to tell when a diaper needs to be changed, as well as some information specific to changing girl or boy babies. Then I'll provide some extra tips and tricks to make the changing process go as smoothly as possible for you.
Lydia has been working in the childcare industry for 15 years, and owned a childcare agency in Florida, USA for 7 years. She has years of experience in changing diapers, in this video she gives a step-by-step guide to changing a baby's diaper.
Changing a Diaper – a Step-By-Step Guide
Even if you've never changed a diaper before in your life, have no fear! I'm about to walk you through everything that you'll need to do, in a simple step-by-step guide.
Read it over before the first few times that you change a diaper. That way, you can be sure you're doing everything in the right order, keeping it fresh in your mind so you won’t miss any critical steps.
You can even set up your phone or tablet to this page and follow along. But I don't recommend handling your device during the dirty steps!
Here's what you'll need to do.
New to this whole baby thing? My article How to Babysit a Baby: The Beginner’s Guide is a great primer to get you started!
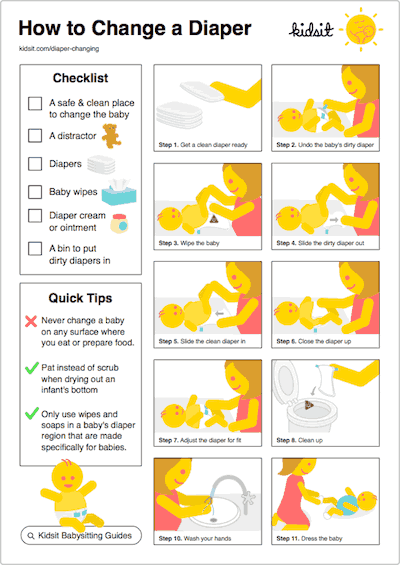
Step 1. Collect the Supplies You'll Need

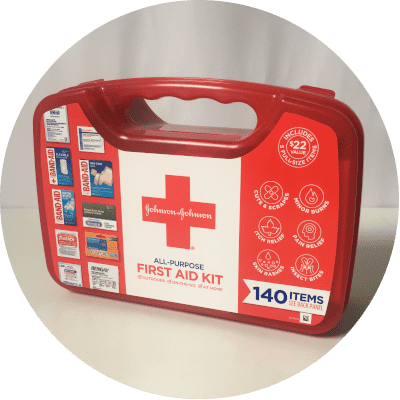
Before you start changing a diaper, you'll want to make sure that you've got everything you need within easy reach. You don't want to have to start rummaging around looking for supplies while you've got a naked baby laid out and dirty hands. And, of course, you never want to leave a baby unattended.
Most families that you babysit for will have a designated area in their house where they change the babies and keep all the related supplies. But it's good to double-check that you're not missing anything before you begin.
Some things you'll need include:
- A safe and clean place to change the baby. This can either be a changing pad or changing table. If it’s a changing table, be careful to use safety straps and ensure the pads are properly anchored before starting.
- A distractor. As babies start to get older, they'll learn how to squirm and roll around while being changed. If a baby is wiggling a lot, you can distract them with a brightly colored toy or hanging mobile.
- Diapers. Either disposable or cloth. You should know how to use either, since different families you babysit for may prefer to use one or the other. And if you are using cloth diapers, make sure to have the plastic pants (nappy covers).
- Baby wipes. (You can also use a cloth or even cotton pads during a newborn baby's first few weeks.)
- Diaper cream or ointment. If an infant you're babysitting has a rash and you need to take special steps while changing them, their parents will likely let you know.
- A bin to put dirty diapers in. You might also want to locate a nearby toilet to empty the bulk of the poop into before binning the diapers, particularly if you're using cloth diapers.
TIP: Always keep one hand on the baby! Even strapped-in babies should always remain within arm's reach.
Step 2. Get a Clean Diaper Ready

Now is a good time to wash your hands before you begin.
You'll want the changing process to go as quickly as possible. So have a clean diaper laid out and ready to swap out for the dirty one right away.
If you're using a cloth diaper, you'll want to put an absorbent insert into it if the style you're using calls for it. For a disposable diaper, just unfold it and lay it out.
Step 3. Undo the Baby's Dirty Diaper

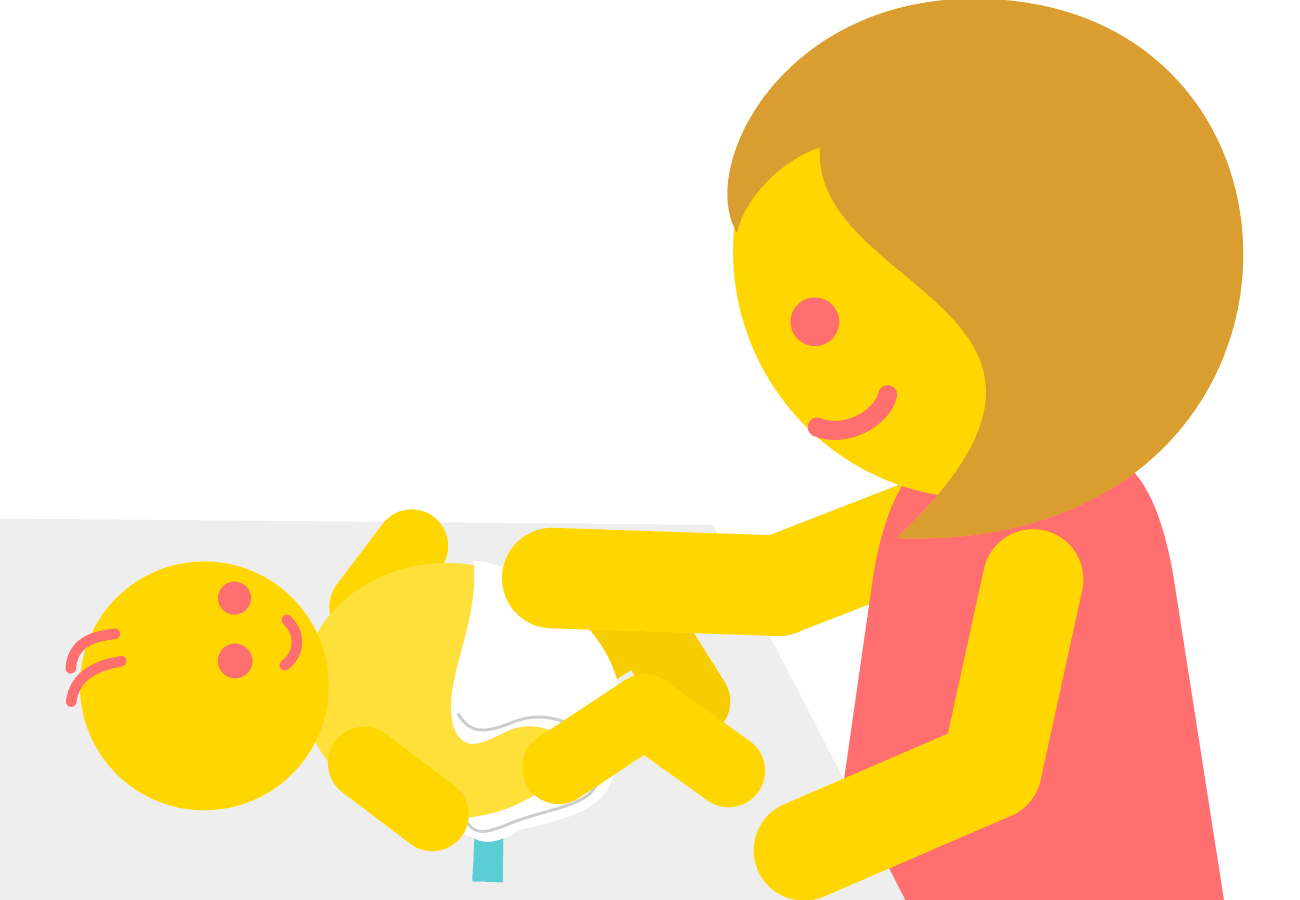
After laying the baby down on the table and making sure they are secured, carefully unfasten the diaper. With a disposable diaper, you'll unfasten the diaper tabs, whereas cloth diapers will usually have snaps or velcro. Hold the baby's legs in one of your hands, and use your other hand to pull the front of the diaper down. You don't want to remove the diaper yet.
For a diaper that's just wet, you can fold it underneath them so that the clean outside part of it is under their bottom. For a poopy diaper, you’re going to wipe up as much as you can off the baby’s bottom first, and then fold it under as well.
Step 4. Wipe the Baby

If your changing table is lengthwise against the wall, lay the baby down so their head is on the side of your less dominant hand (for example, the baby’s head will be on your left side if you are right-handed.) Secure the baby in place with straps, and make sure everything you need is within reach without you having to move from that spot.
If the baby is young, you can gently grab their ankles together in one hand and hold their legs up in the air while wiping with the other hand. This makes it a little easier to reach their bottom. An older baby or toddler will have their knees bent with their feet on the table and legs open like a frog, and you will probably be holding the outside knee with one hand as you wipe with the other. Always wipe a baby from front to back. This is especially crucial for girls and will help prevent them from getting a urinary tract infection.
You can use the front portion of the diaper to give the baby an initial wipe if it's still pretty clean. Then use a baby wipe or damp cloth to wipe the baby again from front to back. Pat the baby's bottom with the diaper or a clean cloth until it's dry to avoid diaper rash.
Be sure to get into all the creases, as babies can have a lot of them. The wiping should always be very gentle, especially when cleaning delicate parts, so you don’t pull on the skin too much, making it more vulnerable to the development of rashes.
Any disposable cleaning supplies that you use, like wipes, can be placed on top of the dirty diaper.
TIP: If you're changing a baby boy, you can place a washcloth or a clean diaper over their penis to prevent them from peeing on you or all over the changing area.
Step 5. Slide the Dirty Diaper Out

At this stage, you can gently lift the baby slightly to slide the dirty diaper out and set it aside for now. Make sure it is far enough away so the baby’s feet don’t get into it. You can finish dealing with it after the baby is fully changed and in a clean diaper.
Be sure to hold their legs up high enough during this step to prevent them from touching the dirty diaper as it slides out.
Step 6. Slide the Clean Diaper In

Once you're experienced at changing babies, you can slide a dirty diaper out and then a clean one under them almost in a single fluid motion, and it becomes second nature. But for the sake of inexperienced diaper changers, I'll list this as a separate step.
Nowadays, most diaper brands have markings or colorful characters to indicate which side of the diaper is the front, so it's pretty foolproof and easy to do when you’re busy dealing with arms and legs.
Any creams or ointments that parents want you to apply for prevention, or special ones for rashes, should be done at this stage after the baby is clean and the area is dried, but before closing up the diaper. It's best to do this with a clean diaper under the baby. That way, creams won't get on the changing surface, as they can smear all over the place as you continue the process and be hard to get off sometimes.
Step 7. Close the Diaper Up
If you're using disposable diapers, the adhesive tabs should go in the back at about belly-button height. The front part will need to be pulled up between the baby's legs. Most cloth diapers will have a Velcro or snap to close and secure them.
When changing a baby boy’s diapers, be sure their penis is pointing down when you're closing the diaper up. Otherwise, there's a chance they could pee out of the top of their diaper.
Step 8. Adjust the Diaper for Fit

You'll want to make sure the diaper fits snug but not too tight or too loose. At the baby's waist, you should be able to fit two fingers in between the diaper and their skin.
If a diaper is too loose, it's likely to leak. And if it's too tight, it's more likely to cause a baby to have an upset stomach and make them irritable, particularly soon after feeding. If you fasten a diaper too tightly, you'll notice red marks or irritation the next time you change it.
For newborns that still have an umbilical stump, you'll need to fold the diaper down to leave it exposed and avoid irritating it. You may also have newborn diapers that have a special cutout, especially for the stump.
Step 9. Wash Up

Once the clean diaper is on and the soiled one is disposed of, it's time to wash up. Wipe down the baby's hands, arms, and legs, which might have come into contact with the dirty diaper during changing. Wipe down the changing surface as well.
Step 10. Clean up

When you are all finished, and you have the baby in a safe place, it is time to dispose of the dirty diapers before doing anything else.
For disposable diapers, parents often appreciate you shaking the bulk of the solid waste into the toilet. This will really help to cut down on the smell. Just don't put non-flushable wipes in the toilet as they can clog up the pipes!
Finally, fold and close the diaper with the adhesive tabs or tape it up to contain any extra mess. Some families may want you also to put each disposable diaper into an individual plastic bag.
For cloth diapers, you'll need to remove the bulk of any waste before putting it in a diaper pail. A lot of families that use cloth diapers will have a special attachment to their toilet for cleaning out dirty diapers. Or you can use a detachable showerhead to rinse the waste into the toilet if it will reach. A cloth diaper that's been rinsed out can be tossed into the diaper pail as-is.
Finally, after the mess is cleaned up, you will wash your hands very well. This step is important to remember so you don’t spread any germs to yourself or others.
Step 11. Dress the Baby

Once the changing and cleaning up is all done, you can put the baby back into their clothes as needed.
Having trouble keeping track of all of these steps? Download the checklist and instructions at the end of this article and keep a copy in your babysitting binder. If you don't have a babysitting binder yet, be sure to read my article Babysitting Binder (20 Documents & Fun Items to Include!)
How Can You Tell if a Diaper is Dirty?
You shouldn't rely only on your sense of smell to know when it's time to change a baby's diaper. It might be time to do so well before you're able to smell it. You want to change a baby as soon after the diaper is soiled as possible. That way, they'll be more dry and comfortable. The longer a baby is left in a wet or dirty diaper, the higher the chance they'll develop a diaper rash.
Remember that younger babies can go through as many as 10 diapers a day, or even more. So it's a good idea to check at least every two hours, even if there are no indications that the diaper is dirty. Taking a look right after a meal is also appropriate, particularly with little babies after a bottle feed.
You might be able to tell that a diaper is dirty right away, depending on how heavy it is. Although diapers are bulky and they can feel like something is in them when there isn't if you aren't experienced with them. So, if they’re not stinky yet, it may take a bit of trial and error until you can tell that a baby has a dirty diaper just by holding or touching them.
If you're not sure, you can pull the waistband of the diaper out a bit to see if it's wet or dirty inside. You can check around the leg area as well. Some disposable diapers contain a strip of liquid-sensitive material that will change color when it gets wet. Cloth diapers will be wet to the touch.
Some babies will also grunt or make faces when they're pooping, and that can give you a hint, although not all babies will make it obvious.
It's a good idea to check a baby's diaper each time before and after you put them down for a nap. But there's no need to wake them for a diaper change while they're sleeping, even if you can tell they've soiled their diaper, unless they seem uncomfortable, were just circumcised, or are being treated for a rash.
Should you be getting paid extra to deal with poopy diapers? See my article Babysitting Pay Rates (How Much Should You Charge?) for some advice.
Diaper Blow-Outs: What To Do
A blow-out is basically when a baby poops so much that it is leaking out of its diaper and can potentially seep through their clothes as well. So, when that happens, get in the mindset that it's already going to be messy and smelly when you open it, so don't freak out.
What I tend to do is I make sure I grab an extra pair of clothes for the baby and I make sure I have enough wipes. If I see that the wipes are close to being empty I grab another one because I don't know how much of this mess I'm going to need wipes for. Then I make sure I have, not just one diaper that you're going to put on them, but two diapers. That is because when I go to change them I will put a diaper going sideways under them so when I open up the diaper they have on, the mess can fall out on to the next diaper.
Babysitter, Infant Swimming Resources Instructor
St Petersburg, Florida, United States
Squirming: What To Do
So squirming kind of looks like this, their legs are flying, their arms are flying, they are trying to roll back and forth, and some kids like to try and flip over. So to stop all that, what I tend to do is I cross their arms and I put my arm on top of their arms, now I press down just enough so that I have them contained, so their arms can't go anywhere, but not too much pressure because that is their chest and I want to make sure that they can still breathe.
Babysitter, Infant Swimming Resources Instructor
St Petersburg, Florida, United States
Gender-Specific Diaper Changing Tips
Whether you are changing boy and girl babies, it’s mostly the same procedure, but here are a couple of minor details to keep in mind.
For Girls
Extra care needs to be taken to avoid getting poop into the vaginal area. Cleaning from front to back is essential for female babies to prevent urinary tract infections.
You don't need to open up a girl baby's labia and clean inside them. It's common for baby girls to have a whitish discharge, so don't be alarmed if you see this or feel like you need to clean it. It’s best to just leave it alone and focus on getting the other parts clean.
For Boys
As mentioned earlier, boy babies pose more of a risk of peeing on you while you're changing them. So cover their penis with a cloth or clean diaper to avoid any splashing.
Boy babies can sometimes get erections. This is totally normal, and it is just a reflex. Don't be afraid of gently cleaning around the scrotum or penis. When boys are a little older, they will usually put their hand down there just as you are opening the diaper. This is common and normal. The only thing you need to worry about is if there is any poop around that they can get their hand into. Girls will sometimes do this too. All you need to do is just move their hand away as if it were any other part of the body and proceed with your diaper change.
Special care may need to be taken for circumcised boys while they are still healing. Be sure to follow any special instructions that parents give you, and be very gentle to avoid wiping that raw area as it is healing.
Help! – I'm Seeing “Blood” in the Diapers
If you see reddish-orange staining in a diaper during changing, you don't necessarily need to panic. It's common to find something called urate crystals in the diapers of newborn babies, which can cause a reddish discoloration.
Unless you're seeing dark red colors or a particularly large amount of red staining in a diaper, it isn't necessarily cause for concern. Red staining from urate crystals can be a common occurrence in a newborn baby that is breastfeeding, although it can also be a sign of dehydration.
If you're concerned about red staining in a diaper during changing, you can always call parents to confirm whether it's normal for their baby or not. You can take a picture of it with your phone and send it. But I would definitely recommend checking with them before you panic and immediately take the baby to the hospital.
Cover Up the Diaper Smell
If you find that you can't change a baby's diaper without gagging, you aren't alone. Instead of being stuck trying to hold your breath, there are a few things that you might want to consider trying.
Putting some Vaporub, essential oil, or other pleasantly smelling substance underneath your nose on your upper lip can help mask the scent. Or if it's particularly bad, you can try applying something minty inside of a dust mask and then wearing that while changing the baby, although that look might frighten the child a bit.
Baby Powder – Yes or No?
You might notice that I didn't mention baby powder anywhere in my step-by-step guide on changing a diaper. People used to think (and some still do) that powder would soak up the moisture. But nowadays, experts don't recommend using any kind of powder in diapers. Both talc and baby powders containing corn starch are linked to breathing problems, lung damage, and choking in babies. Despite the fact that there are still several ongoing lawsuits related to a potential link to cancer, baby powder is still widely available for purchase.
The best prevention for diaper rash is an ointment like petroleum jelly, or a cream containing zinc oxide. These create a barrier between bodily wastes and the skin. Whichever one of these you decide to use, the key to its usefulness is how it is applied. Once you clean the area, it must be dried thoroughly. Then a large amount of the barrier ointment should be placed on all external areas that may come in contact with urine or stool because it’s the acids and enzymes in those, along with the moisture, that break down the natural skin barrier and cause rashes.
Most of the time, babies don’t need a ton of the barrier ointment because their skin is in good shape, and their diapers are being changed pretty regularly. But if they have diarrhea or if there is a slight rash beginning, that is the time to really pour it on and prevent any contact with the skin. Rashes tend to be more common with disposable diapers, and you are less likely to run into them in babies who wear cloth diapers exclusively.
Of course, it will depend on what the parents you're babysitting for ask of you. But if given the option, I would opt for any other product before using talcum powder or any other type of baby powder, mostly because it just doesn’t work.
Always be Prepared for Diaper Changes when Leaving the House
Will you be taking a baby outside for a stroll, or planning to do some grocery shopping or other errands for parents while you're babysitting? One of the biggest mistakes you can make is leaving the house without taking enough diapers and other supplies with you.
Whether or not you suspect that a baby will need to be changed once while you're out, bring at least three or four extra diapers. It's better to have diapers with you at all times, along with backups for your backups, instead of running into a situation where you're out in public with a baby who has a soiled diaper and nothing to swap it out for.
Kids seem to have a knack for starting to go to the bathroom again halfway through a change, so you'll need to have a spare more often than you'd think.
Most families should have a diaper bag they can leave with you, which will hold all the diapers you need, plus any other products you might need, like wipes, pacifiers, diaper cream, etc.
Most women's bathrooms in large shops, restaurants, and other places will have changing tables available. But this is less common in men's bathrooms. So if you're a male babysitter, you might want to scope out locations in advance where you know there are changing tables. Otherwise, you might get stuck trying to change a baby's diaper on a bathroom counter or floor or in the back seat of your car, although it’s very common for parents to have done all of the above.
Parents are late, and you're still stuck changing diapers? Read my article What To Do If Parents Are Late Home? (4 Tips For Babysitters) to see what you should do.
Watch for Diaper Ruffles on Disposables
On most disposable diapers, you'll see an inner and outer ruffle. When you're putting on a clean diaper, it's important to make sure that the outer ruffles aren't tucked in. This acts as an extra barrier to prevent leakage, and it will help prevent blowouts if a baby has a particularly large poop. It can also cause irritation and rashes because, when the baby moves, it pulls against the skin in those areas.
Use Diaper Changes as a Chance to Bond
Changing diapers is a great opportunity for babysitters to bond with babies that they're watching, especially if you're potentially going to be doing it every couple of hours.
When you're changing diapers, it's a great time to talk to babies, practice making eye contact with them, talk to them, sing them some songs, and generally try to get them to smile.
Even though you're dealing with poop, changing diapers can be an opportunity for babies and their babysitters to bond. Plus, talking and playing can help get your mind off the smell and make the process go by quicker for you too.
Additional Quick Diaper Tips
- Never change a baby on any surface where you eat or prepare food. That makes the entire kitchen a no-go zone when it comes to changing diapers. Even if you're thorough and wipe surfaces down when you're done, there's no guarantee that you didn't miss any microscopic bacteria. So it's better to keep food and poo as separate as possible.
- Pat instead of scrubbing when drying out an infant's bottom to reduce the chance of causing irritation.
- Only use wipes and soaps in a baby's diaper region that are made specifically for babies. As a good general rule, don't use anything scented, which could irritate their sensitive skin.
- Use diapers as multi-purpose tools. They aren't just for holding waste. You can use a clean diaper underneath a dirty one as a pad to catch any excess spillage or to wipe a baby down if you don't have anything else to work with. And, of course, one can also be used for protection during changing to avoid getting an unwanted spray.
Don't Panic about Changing Diapers!
If you haven't changed a diaper before, it can be easy to get worried, frustrated, overwhelmed, or just plain grossed out.
Don't feel like you're a failure if you mess up and need to start over. And don't get worried that you're taking too long if a baby starts crying during changing. Many babies cry when they’re being changed! It's better to take your time and make sure the baby is clean and properly fitted with a new diaper first. Then you can calm the baby down afterward.
Learning how to change a diaper is something every babysitter will have to go through eventually. And it's mostly a trial and error process. Even though I've given you a step-by-step rendition of what to do, there's still an element of having to actually try it and get your hands dirty to understand fully (no pun intended).
You'll get faster and better at changing diapers the more that you practice. So don't freak out if you aren't perfect after the first couple of attempts.
Download our Diaper Changing Guide
Download our printable guide to changing diapers and keep a copy in your babysitting binder, so you always have it with you while you're on the job.
(how-to-change-a-diaper.pdf 251kb)
Download our other printable babysitting documents too!
Conclusion
For most babysitters (and parents too), the biggest thing to get over with changing diapers is often the "ick factor." The smell and sight of a dirty diaper can be a lot to deal with if you've never encountered anything like it before. But if you've ever cleaned a cat's litter box or picked up after a dog, that's something similar that you can relate it to.
In terms of whether you're doing it right or not, there are a few main things to watch out for when changing a diaper. You want to make sure the baby is safe on the changing table at all times, and you don’t leave them there for any reason. You should thoroughly clean a baby's bottom while changing them, and they shouldn't be wet when you put the cream or a new diaper on them.
You'll also want to check the fit to make sure the diaper isn't too tight or loose.
Everybody has to go through the trial and error process of changing their first few diapers. If you're inexperienced or uncomfortable trying to change a diaper yourself, first ask a parent if they'll show you how they do it, and then watch you the first time before leaving you to do it alone. Try to get a family member with a baby to let you watch them change a diaper or try it out yourself before being left alone with a child that isn't potty trained yet.
Next:
How to make baby formula